
Zendesk time tracking
Automatic time tracking app for Zendesk tickets for better productivity & billing clients.
How it works
Install TimeCamp time tracking plugin from Zendesk Marketplace on your account and track time to Zendesk ticket's with one click!
Easy time tracking for Zendesk tickets
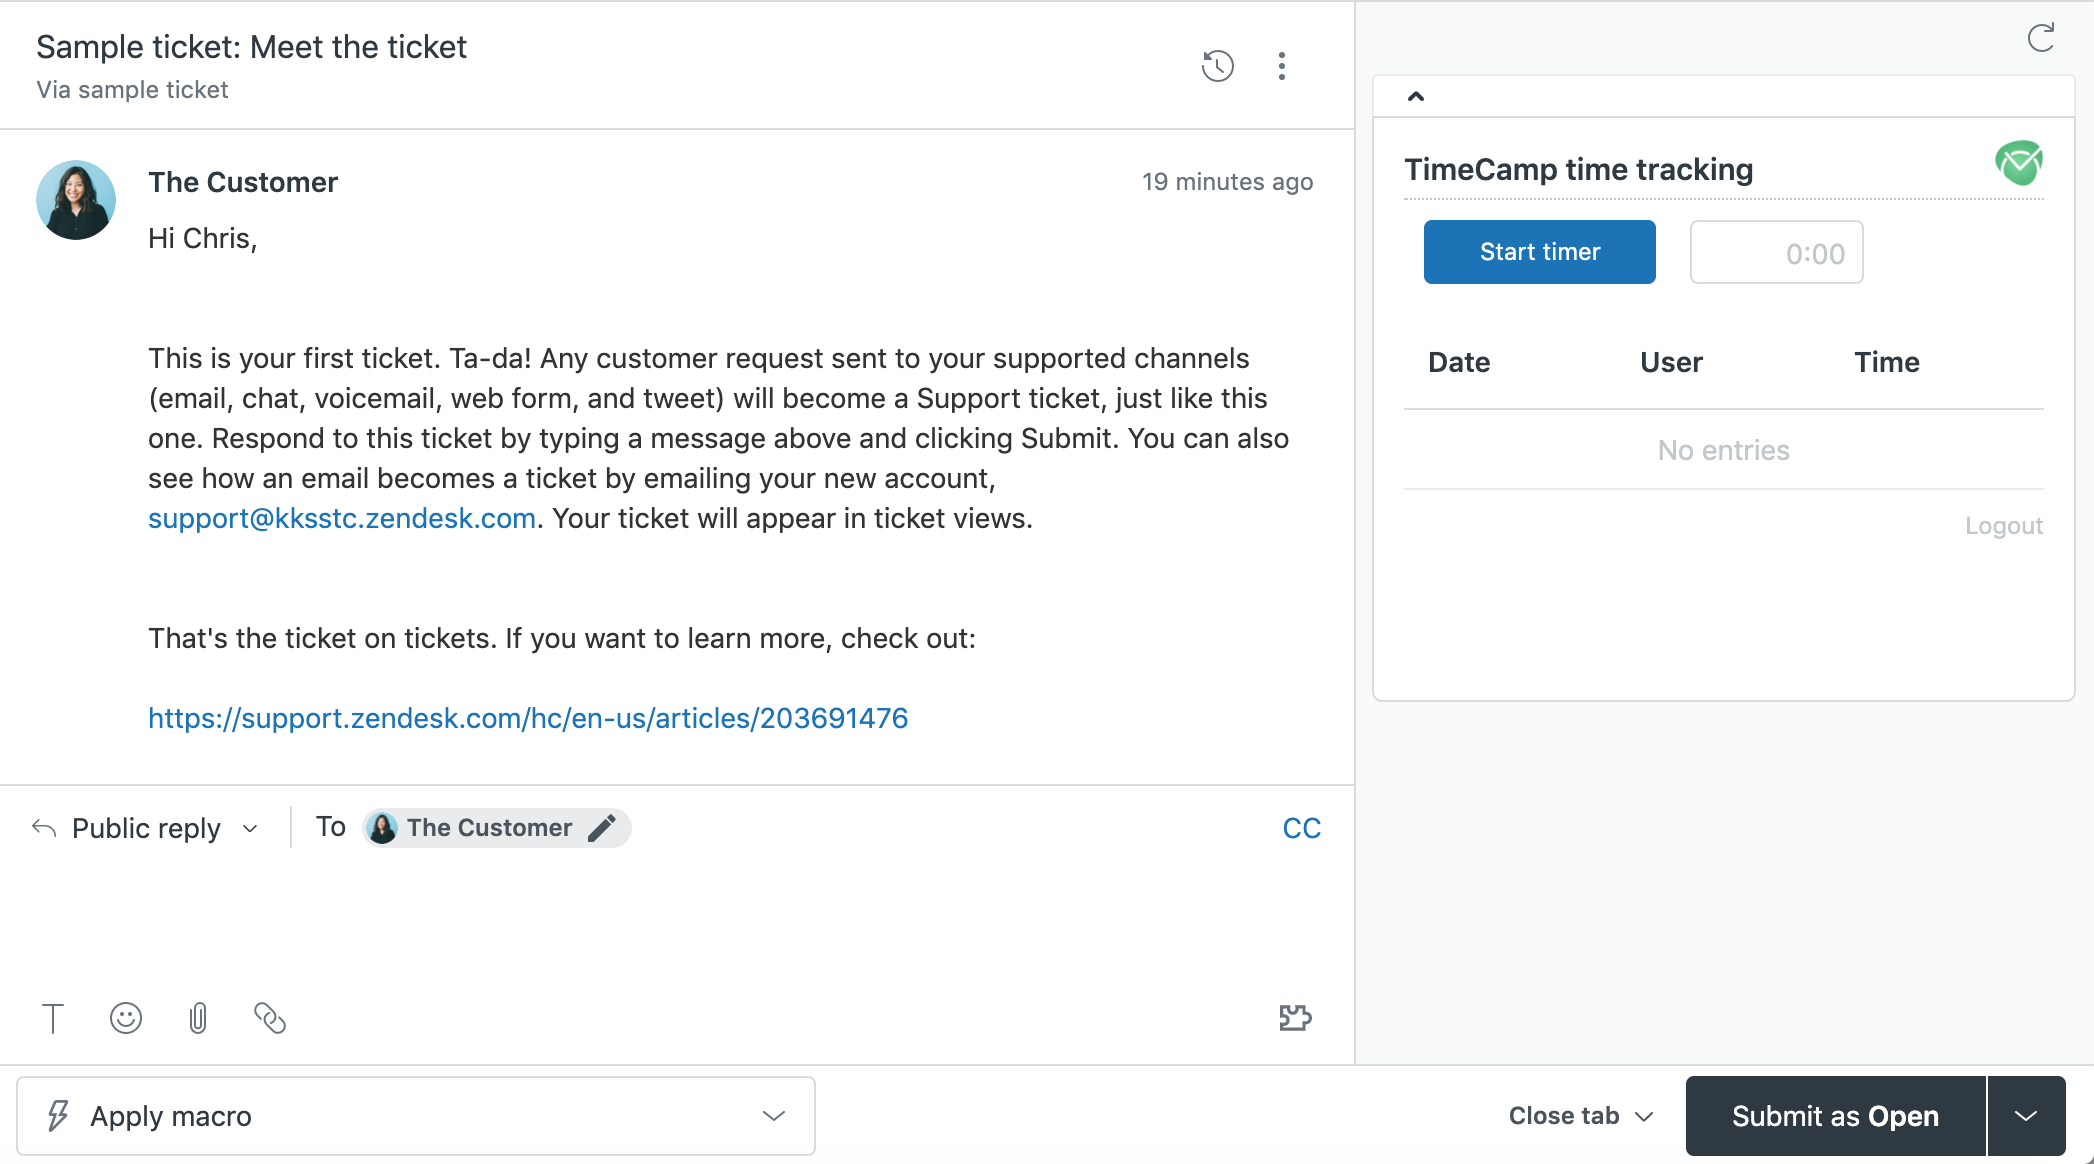
With TimeCamp time tracking Zendesk Plugin you can track time spent on a ticket with one click. Just press TimeCamp button on your ticket and we'll do the rest for you. Generate timesheets basing on your Zendesk time.
Zendesk time tracking reports
With TimeCamp robust reporting you can see total time spent by teams or agents per client and ticket from Zendesk. Export your time tracking data to Excel, PDF or share it with email or link to your client.
Desktop time tracking
Install TimeCamp desktop app, select the client ID and ticket and track time in the background. Our desktop time tracking app can also track time spent in Zendesk, other apps & websites.
Assign budget to clients and tickets
Set up time budget, that agents can spent on clients or tickets for better control of the profitability of your processes. In reports you can see how much time is already in use and what's left in the budget.
Invoice your time
Import your clients from Zendesk to TimeCamp app. Assign billing rates to your employees or clients. Generate invoices based on time spent on resolving their tickets.
Get more done quickly
Empower the productivity of your Customer Service with time tracking. Get your TimeCamp now.
Easy setup
Note: If you don't have a TimeCamp account, click here to register for a free 14-day trial.
Below you can find how to enable the integration:
1
Go to the Integrations section in TimeCamp and enable the Zendesk integrations.
2
Get TimeCamp time tracking plugin from Zendesk marketplace.
3
Enjoy tracking time automatically from the Zendesk ticket.
Benefits include
- Timer inside of Zendesk tickets
- Desktop app to track time automatically
- Easy manual modification of time entries
- Check time spent by team, agent, Zendesk client, ticket
- Automatical email reports
- Export reports to Excel, PDF, or share the report with link
- Track time spent on apps & websites for a better view of team productivity
- Make screenshots for better transparency
- Limit time budget per client or ticket
- Assign billing rates to your agents or clients
- Generate invoices based on time spent for your clients


TimeCamp and Zendesk integration
Modern marketing is significantly different than conventional methods. Today, businesses prioritize forming relationships with their customers instead of solely focusing on selling them. The customers are also more inclined towards the brands that value them and are quick to respond to their predicaments.
Understandably, the most effective means to create and maintain a seller-buyer bond is to establish smooth communication. It includes responding to the customer's problems quickly and providing a solution before they lose their trust in the brand.
Many businesses struggle with the need to be active on dozens of online platforms their customers use to contact them. And that is precisely what Zendesk aims to solve. With the Zendesk time tracking app, your customer support representatives can simultaneously be active on several platforms and track their work time.
If you are a business that finds it hard to keep track of your customers' queries and your support team's time spent managing them, TimeCamp and Zendesk integration could be a game-changer for you. And this article has all the help you will need.
So keep reading.
Zendesk time tracking
The Zendesk ticket time tracking system offers multiple features to maximize your productivity.
Zendesk uses a ticketing system to organize and provide support requests in a single dashboard so you can prioritize them suitably. For example, if you receive a message from a customer through Twitter, your customer support team member will receive the query as a ticket and can respond without logging in to Twitter.
But to make your support team efficient and systematic, you will need to track the time they spend tagging, categorizing, assigning tickets, and submitting and resolving them to solve the issues. And you can achieve that with Zendesk tracking time.
How time tracking with Zendesk works?
TimeCamp is the best time-tracking app for Zendesk. It is a time tracking software you can easily integrate with Zendesk to boost your productivity and count billable hours.
The TimeCamp and Zendesk integration works with a simple plugin you can get from the Zendesk marketplace and add to your account. TimeCamp will track time spent on each ticket from receiving to submission to resolution with just one click.
The Zendesk ticket time tracking API enables you to:
- Generate timesheets: You can use your Zendesk app to generate timesheets that record your billable hours on Zendesk tickets.
- Share records: The Zendesk time tracking app reporting is sharable through PDF, Excel, email, or simply via a link shared with the client.
- Budget clients: Allocate appropriate time budgets to each client and work efficiently. TimeCamp shows the time left for each client from their budgets.
- Track time on desktop: The TimeCamp desktop plugin allows time tracking while using the TimeCamp Chrome extension or other apps (if you like Zendesk Chrome extensions, it might be the best solution for you).
- Send invoices: It is effortless to assign price rates to your clients and send them invoices for the billable hours through the Zendesk and TimeCamp integration.
How to enable the TimeCamp and Zendesk time tracking integration?
Enable the TimeCamp and Zendesk tracking time system by clicking on integrations in the TimeCamp account, select enable, get the Zendesk plugin, and start tracking time automatically.
Once you have a TimeCamp account, Zendesk time tracking integration is easy. All you need to do is these simple steps:
Step 1. Enable Zendesk integrations
Head over to your TimeCamp account and click on integrations. Select enable on Zendesk time tracking integration.
Step 2. Get Zendesk plugin
You can get your TimeCamp plugin from the Zendesk marketplace.
Step 3. Track time automatically
Run both apps simultaneously to track the time you spend on each ticket.
Benefits of Zendesk time tracking integration
The time tracking app Zendesk increases your productivity, lets you share time reports with clients, track your team's performance, set time limit per ticket, and makes billing straightforward.
Tracking time and keeping a record of it is a crucial skill you will need to run a successful business. The Zendesk time-tracking insights make the process easier and provide many benefits.
Get more done quickly
With the Zendesk ticket time tracking inside Zendesk tickets, it is possible to create a sense of urgency and get more done in the allocated time.
Share your time reports with anyone
With timesheets accessible through various mediums, it is easy to share Zendesk time-tracking reports with clients for seamless billing.
Track your team's productivity
Keep an eye on your support team's time on each ticket and take screenshots whenever needed. Zendesk tracking time helps to boost your productivity and make amends where needed.
Set a time limit per ticket
With a set time limit your team can spend on a ticket, your response and customer satisfaction rates will improve.
Enjoy no fuss billing
Assign payment rates to different clients and agents and generate invoices from the app based on those rates.


One simple tool to measure everything your business needs.
Remember, you can't improve something if you're not measuring it! If you're tired of the constant guessing, give TimeCamp a go!


Trusted by 18,000 teams from all over the world (and still growing!)
Want to track time in your team ?
Book a Demo >